

SAFELY TRADING UNCHARTED WATERS WITH INSTITUTIONAL TRADE ZONES
It must have been a magnificent sight to behold – aboard the Santa Maria with the Nina and Pinta in full view. Under the bright light of the moon with literally a new world awaiting – Christopher Columbus just needed to make sure he was heading in the right direction. Minor detail.
At the time, he had two choices: Dead Reckoning which involved pins, maps and a compass – or guidance by the stars. Yes, he could look to the heavens and gauge his course based on the ship’s relationship with a star.
Many, if not most, forex traders have no idea where their trade is headed. Looking to the heavens, they hope for some kind of sign. Looking down at their charts and the lines that they’ve drawn – they’re hoping their guess will pan out.
Fortunately, you have institutional trade zones to show you the way.
WHY ARE MOST FOREX TRADERS LOST AT SEA?
State-of-the-art ship navigation in 1492 involved chants, flotsam tossed over the side of the ship, and gazing at the stars. Okay, that doesn’t give the navigators of the time nearly enough credit – but it’s a far cry from the GPS screens that guide people across town today – let alone across an ocean.
Despite having advanced entry location tools at their disposal, many forex traders put their finger in the wind and gaze at the stars to determine where the market is. This is often because they’re relying on a price-based indicator or unreliable support and resistance methods to market entry points on their chart.
Every day, the currents of the market are moved, not by a $10 indicator, or a cheap compass – but by massive institutional traders. We’re talking the big ships that drive 90% of the market volume. Not knowing where they are, what direction they’re headed, or what rate levels they like (or dislike) – is like staring at the stars and choosing a trade location.
Fortunately, the guesswork can be quickly taken out of trade locations – simply by knowing where the institutional zones are and when a rate is approaching them.
WHAT ARE INSTITUTIONAL TRADE ZONES?
On his second voyage, Columbus sailed along the southern coast of Cuba for more than a month – never reaching its end. He decided that there was no use in going any further since he thought it was a peninsula connected to a larger area of land. This was a common mistake made by explorers – Marco Polo had the same issue in Asia.
When circling a trade, most retail forex traders have no idea where they actually are and the waters their little account happens to be sailing in. When a rate gets ready to move – they have no idea if it’s connected to a larger trend – or if in fact they’re rounding the corner on a reversal.
Never enter a currency pair’s waters without knowing where the institutional trade levels and zones are!
Institutional trade zones reveal most, if not all of this. They plot the rate levels where the institutions have seen extremes – and have either moved in or backed away. These are the exact levels that institutional traders are watching for when plotting an entry and the course of the trade.
Like a map, these institutional zones are established and confirmed over time. They are validated and then adjusted as they are visited time and time again by a currency pair’s rate.
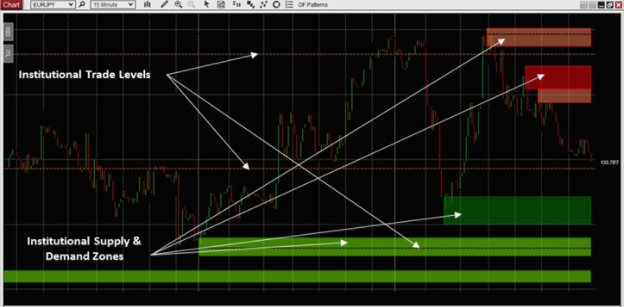
Check out the EUR/JPY chart above. Here you have both institutional trade levels and institutional supply/demand zones. Note how price respects these levels consistently.
Like an advanced compass, you’ll never want to venture into a currency pair’s waters without knowing where these levels/zones are.
HOW CAN I USE THESE FOR VOYAGES THAT LEAD TO SUCCESS?
Columbus actually discovered America on Thursday, October 11th – but had to wait until the following morning, October 12th, to confirm. His personal journal accounts the events in detail. He saw a light – but needed confirmation. So he halted his ships and waited for dawn.
Some 525 years later, and October 12th is a federal holiday. You don’t need to wait for dawn, nor will you be guessing at a distant light when trading with institutional trade zones. You simply need to watch your currency pair’s rate level and plot your landing as it approaches either a supply and demand zone or an institutional level.
Multiple entry and exit points – all in a day’s work – just by trading with institutional levels and zones!
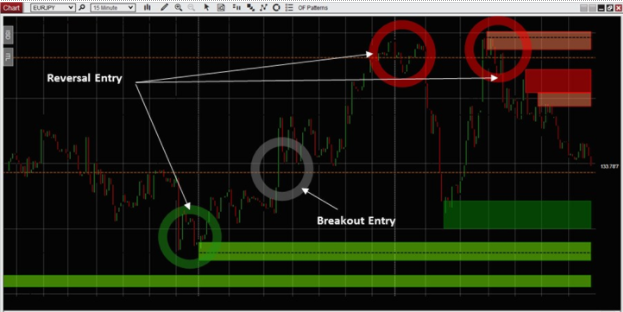
Depending on your trading strategy and preferred timeframe, you can enter for minutes or plot these moves over days – it really doesn’t matter which. Using our same EUR/JPY example – you’ll find multiple entry and exit points to support different trading strategies.
Keep in mind that these just aren’t reversals you’re looking for. These trade levels also work with continuations. When they’re crossed – like an international dateline – there’s no turning back (not right away anyway). You can watch these moments and get ready to trade with the breakout or trend.
Note the multiple reversal entries and attractive breakout entry simply by glancing at these zones and levels. Track these levels, keep an eye on volume and then make your move as the currency rate approaches.
SET YOUR COURSE FOR SUCCESS
On his first voyage, Columbus tried at least five times to use the celestial approach. Each time he abandoned it in favor of a compass and dead reckoning. Although reading the stars would come a long way, he didn’t seem to have much confidence in leaving the fate of his ships and crew to the stars.
Leave the stars out of your entries and exits when sizing up your trades. Add institutional levels and zones to your chart and use them as your guide. Know that the real magnetic forces driving your currency pair’s rate action are found in these levels.
As the rate approaches an institutional trade zone or level, prepare for a reversal. If it shows signs of backing off – thanks to Order Flow data, make your move. If it shows signs of plowing through with overwhelming wind at its back – adjust your sails and trade with it.
Set your course for success using institutional trade levels as your guide.